How to tie shoelaces - Shoelaces used to be purely functional accessories, but now they are often used to decorate shoes. On some models, in addition to lacing, there is an additional zipper, and the laces in these models are a decor. Therefore, the choice of laces and options for tying them, there are many.
Types of laces
Laces have been known since ancient times, and the first confirmed information about this accessory dates back to the 13th century. Lace was used for both clothes and shoes. There are many types of laces. There are two options for the form:
- Round. More suitable for classic shoes.
- Flat. They are often worn with sports models - sneakers.
By type of materials are distinguished:
- Cotton. These are durable products, provided that high-quality long-pile cotton is used for the manufacture.
- Cotton with the addition of synthetics. This is perhaps the most common option. They are inexpensive and durable.
- From polyester. Practical and durable laces, however, are not without drawbacks.
- Silk, silk with satin, velvet. Used for formal shoes, while the laces are matched to a bow tie.
- Leather. This type of lace is typically used on topsiders.
- Kevlar. They are used on boots for climbers, skiers, etc. They are distinguished by their special strength.
- Elastic. Used with informal, including sports shoes.
- Silicone. As a rule, these are models of neon colors, used on sports shoes. See Also: most comfortable men's business casual shoes.
There are three thickness options - thick, medium, and thin. Thick ones are used mainly on sports shoes, medium ones are a universal option, and thin ones are used with classic shoes.
Classic laces were produced exclusively in the color of the shoes, that is, one could meet black, brown, and less often white. Now laces are produced in a variety of shades and colors. At the same time, you can select accessories, both according to the color of the shoes and according to the principle of contrast. Bright laces look great with sports shoes.
When choosing laces, pay attention to the length. Each pair of shoes has a certain number of holes. The more of them, the longer the laces should be.
Universal option - length 80 cm, such products are suitable for shoes with lacing for 6 holes. But if there are more holes or you plan to use the original lacing option, then longer laces will be required.
How to tie shoelaces in the store
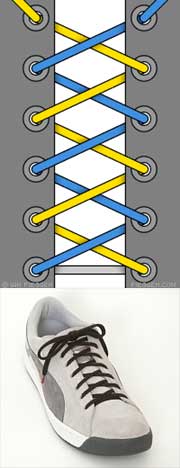
Shop or diagonal lacing can be made for any number of holes. Execution scheme step by step:
- They start from the outside, threading both ends into the bottom pair of holes in the direction from the front side inward (indicated in gray in the figure).
- Then the left end (indicated in blue) is drawn diagonally and brought out through the upper right hole.
- The right end (yellow) is drawn diagonally to the left to the second hole and brought out.
- Next, the right end along the front side is drawn straight to the opposite second hole and threaded onto the wrong side.
- Repeat until you reach the top hole, then tie the ends in a knot or bow. So that they do not untie, it is better to hide the loops of the bow and the ends of the lace inside.
To give a symmetrical look, the left and right boots need to be mirrored.
Classic schemes
First, let's look at the classic schemes. The simplest and most popular option is the cross. Scheme:
- The lace is passed from the inside out through the bottom pair of holes, and the ends are aligned.
- The ends are crossed and passed from the inside out into the second pair of holes.
- Repeat this to the end.
This lacing is suitable for any number of holes. Easy and convenient way.
A slightly more complex classic scheme, with crosses "Above-under":
- The lace is threaded from the outside to the inside.
- I cross the ends and bring them out from the inside to the second pair of holes.
- The ends are crossed again and lead from the outside to the inside into the third pair of holes.
Repeat until the end. In the event that the number of holes is odd, you need to start lacing from the inside, that is, thread the lace outward into the first pair of holes.
Originally tying shoelaces on sneakers
You can lace up the laces in a simple, but more original way.
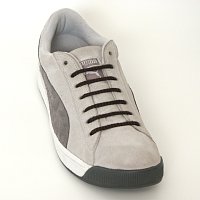
Simple straight lacing
This version of the classic lacing looks spectacular. The scheme of its implementation:
- The lace is threaded from the outside to the inside.
- The right end is drawn along the inside to the upper hole and brought out.
- The left end is brought out into the second hole on the left side, then it is drawn along the outside to the second hole on the right side and wound inward.
- The left end is brought to the top hole on the left side and connected to the right end.
The lacing looks neat. It is easy to do, the only difficulty is to align the ends so that they are the same at the top hole. This option is only suitable for models with an even number of holes, a minimum of 4 holes.
The second version of straight lacing
- The lace is threaded from the outside into the bottom pair of holes.
- The right end (indicated in yellow) rises from the inside up and out into the second hole and is threaded into the second hole on the opposite side.
- The left end (indicated in blue) is drawn up to the third hole in a straight line, brought out, and threaded inward into the third hole on the opposite side.
Such lacing can be done without a bow. To do this, the left end of the lace (blue) is not brought to the top hole, and the right end (yellow) is brought to the end. When both ends are on the inside, they are tied and the ends are hidden inside.
The scheme is only suitable for shoes with an even number of holes.
Complex schemes for 6 or 8 holes
If you have time to tinker, then you can use more complex lacing patterns. Such options can be used if the boots have at least 6 pairs of holes, but it is better to use them for 8 holes.
lattice lacing
Lattice lacing looks spectacular, but it is difficult to tighten it evenly:
- The lace is threaded into the bottom pair of holes from the inside.
- The ends are crossed and threaded from the outside to the inside into the fourth hole from the bottom.
- Then the ends are drawn up along the inside, threaded to the outside, and drawn along the top of the already laid diagonal lines diagonally down to the second holes from the bottom.
- The next step is to draw the laces along the inside in a straight line to the third hole and bring them out.
- I lay the ends diagonally to the upper hole, passing under the already laid diagonals.
Checkered shoe lacing
- Checkerboard lacing is used on loose sneakers that can be taken off and put on without unlacing. You must perform two flat wide laces of a different, best of all, contrasting color.
- With a lace of the same color, perform straight lacing, as described above, but you need to start not from the bottom pair of holes, but from the top. Do not tighten too tightly, tie the ends in a knot and wrap inwards.
- Start lacing with the second lace of a contrasting color from below, passing it either over or under the bottom of the already laid lines.
- Draw the lace in this way to the very top, then wrap it around the upper "crossbar" from the second lace, and start moving down in the same way.
- Continue until the gaps are completely filled, and tie the ends inside the boot.
Such lacing cannot be pulled tight, so it is not suitable for all shoes, but only for free ones. Moreover, such lacing is not easy to perform, and you will not unlace it every time you take off your shoes.


