 |
| how to use plumbing tape |
Plumbing tape, also known as Teflon tape or thread seal tape, is a versatile tool that every DIY enthusiast or homeowner should have in their toolkit. Whether you're tackling a leaky pipe or installing new plumbing fixtures, this thin, flexible tape can be a lifesaver. In this comprehensive guide, we will explore the various applications of plumbing tape and provide step-by-step instructions on how to use it effectively. So, let's dive into the world of plumbing tape and learn how this simple yet invaluable tool can help you conquer plumbing projects with confidence.
Understanding Plumbing Tape
Before we delve into the nitty-gritty details, let's familiarize ourselves with plumbing tape. It is a thin, white tape made from Polytetrafluoroethylene (PTFE), a nonstick material commonly known as Teflon. Plumbing tape is primarily used to create a watertight seal on threaded pipe connections. Its main purpose is to prevent leaks by filling the gaps between the threads and creating a tight, secure joint.
When to Use Plumbing Tape
Plumbing tape is an indispensable tool in various plumbing scenarios. Here are some common instances where using plumbing tape is highly recommended:
- Installing or replacing plumbing fixtures: When connecting pipes, faucets, showerheads, or other plumbing fixtures, applying plumbing tape to the threaded connections ensures a tight seal, preventing potential leaks.
- Repairing leaky pipes: If you encounter a small leak in a threaded joint, using plumbing tape can provide a temporary solution until you can properly fix the problem.
- Sealing gas lines: Plumbing tape is also suitable for sealing threaded connections on gas lines, helping to prevent gas leaks and ensuring the safety of your home.
- Working with plumbing adapters: When connecting pipes with different diameters or materials, using plumbing tape can help create a secure and leak-free connection.
How To Use Plumbing Tape
Now that we understand the importance of plumbing tape let's move on to the step-by-step process of using it effectively:
Step 1: Gather the Required Materials
To get started, make sure you have the following items readily available:
Plumbing tape: Purchase a high-quality plumbing tape from your local hardware store or home improvement center. Look for tapes labeled specifically for plumbing or Teflon tape.
Clean cloth: Keep a clean cloth nearby to wipe away any dirt or debris from the threaded connections before applying the tape.
Pipe wrench or adjustable wrench: These tools will come in handy when tightening the connections after applying the tape.
Step 2: Prepare the Threaded Connections
Before applying plumbing tape, it is crucial to prepare the threaded connections properly. Follow these steps:
Ensure that the threads are clean and free from any dirt, debris, or old tape residue. Use a clean cloth to wipe the threads clean.
For better adhesion, it is recommended to apply a thin layer of pipe joint compound (also known as pipe dope) to the threads before using plumbing tape. This compound helps to create a stronger seal.
Step 3: Applying the Plumbing Tape
Now that the connections are clean and prepped, it's time to apply the plumbing tape:
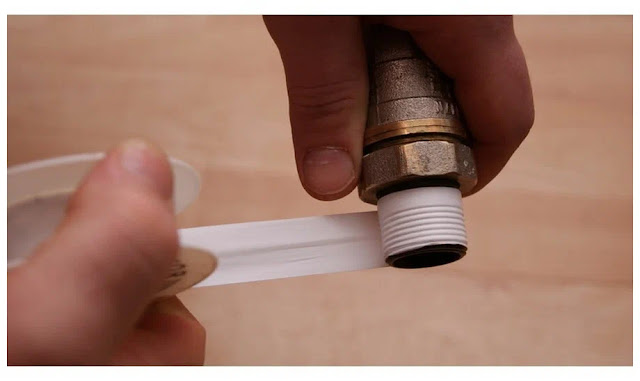
Begin at the end of the male threaded connection (the part that screws into the female connection) and hold the end of the tape against the threads.
Wrap the tape around the threads in a clockwise direction. Ensure that the tape overlaps itself as you progress. Apply gentle tension to the tape while wrapping to ensure a snug fit.
Continue wrapping the tape around the threads for approximately 3 to 5 revolutions. Be mindful not to wrap it too tightly, as this could lead to tape breakage during tightening.
Once you reach the end of the threads, tear or cut the tape cleanly from the roll.
Step 4: Making the Connection
With the plumbing tape applied, it's time to join the threaded connections:
Carefully thread the male and female connections together by turning them clockwise. Begin by hand tightening until resistance is felt.
Once hand tightened, use a pipe wrench or adjustable wrench to firmly tighten the connection. Avoid over-tightening, as this can damage the threads or cause leaks.
Step 5: Final Checks
After making the connection, perform the following checks to ensure a proper seal:
Inspect the connection for any visible gaps or tape protruding beyond the joint. If necessary, reapply plumbing tape and repeat the connection process.
Turn on the water supply or gas (if applicable) and check for any leaks around the joint. If you notice any leaks, tighten the connection further or repeat the process with a fresh layer of plumbing tape.
Conclusion
Plumbing tape is a valuable tool that empowers homeowners and DIY enthusiasts to tackle various plumbing projects with confidence. By following the step-by-step instructions provided in this guide, you can use plumbing tape effectively to create leak-free connections, whether you're installing new plumbing fixtures or repairing existing ones. Remember to always use high-quality plumbing tape and prepare the threaded connections properly for optimal results. With practice, you'll master the art of using plumbing tape and be well-equipped to handle common plumbing challenges with ease.